 | HTML5/Javascript - How to Create a Motion Guide Programmatically |
HTML5/Javascript is somewhat good in its capabilities of creating animation. One of the things it has the capability to do is to create a motion along a random path called a motion guide. This tutorial will explain how to do it solely using Javascript. The reason that I wrote this article is that I have found it easier (and cleaner) in the long run to use my own function to animate an object.
This tutorial is for those who already have some HTML5/Javascript programming experience.
You can download the .ZIP file before proceeding and reference the tutorial for explanations.
To Download...Right click, Save Target As --> motionguide.zip
This tutorial is for those who already have some HTML5/Javascript programming experience.
You can download the .ZIP file before proceeding and reference the tutorial for explanations.
To Download...Right click, Save Target As --> motionguide.zip
 |
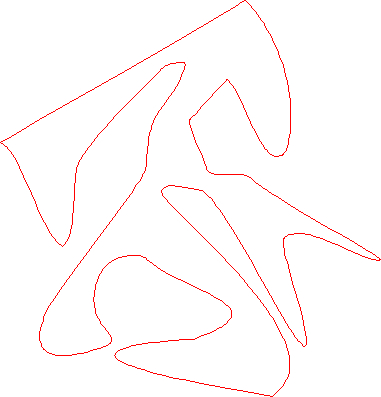
The goal of this tutorial is to be able to create a object to travel along a fixed path:
Here are the first steps to get this to work:
The first step is to create an image. This image is going to be the motion guide. When creating the motion guide image in fireworks or any other paint program, use a line thickness of 1 and do not use any anti-alias. The edges must be hard edges otherwise the motion guide will be thicker than a one pixel curve line. Also try not to use too many jagged edges. Make sure the background is transparent because white is considered a color and save it as a PNG.
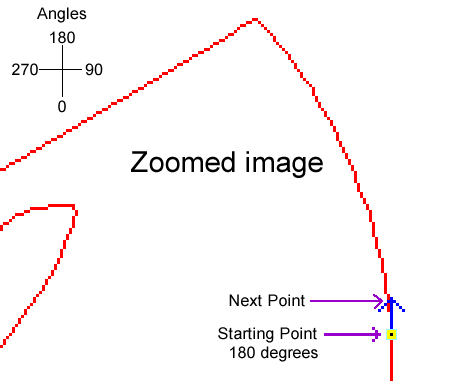
Example:

In this example, I have also attached a ball image to the project because the ball is being used to travel along the motion guide. The way this works is that you first set the X point, Y point, Angle, and # of steps where the center of the ball will start. As the ball in this example is moving in that direction it is also moving in that direction a number of pixels. In the code you will notice this example the number of pixels is 5. You must make sure that the initial X and Y point falls on a pixel of the red curve.
Example:

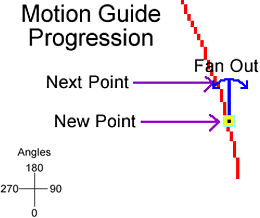
Once the ball moves in that direction a number of pixels, it then has start out at the current angle which is 180 degrees and fan out in both directions simultaneously to actually find where its next destination point is going to be. This next point will be determined by the motion guide image and is determined by retrieving the X/Y pixel color information. If the pixel is red, then that is the next point. Once it finds the next point it will also have already have determined the new direction from the "fanning" process. In the example below, the next point is a little to the left of the starting point which is approx 200 degrees.
All these calculations takes place in the function motion_get_next_point(p_arr,p_space)
Example:

The ball will continue to travel along the motion guide a fixed number of steps that is defined at arr_motion[4]. Once the count arr_motion[3] equals arr_motion[4] then the ball will stop. if the steps arr_motion[4] is defined as -1 then the ball will travel indefinitely!
Well that is about it. You can reference the code to understand how it works. Just remember you need to be precise when initially defining the X and Y coordinate on where the ball will start.
One quick note: You can also write a "initial point" function (instead of being precise) that will check the X and Y coordinate for a red point and if none is found it then decreases Y by one (Y=Y-1) and does another check until a red point is found and that would be the starting point. This would replace you having to accurately set the X,Y coordinates on the red curve for the initial point.
Well, that is about it, hope it helps!