 | Flash AS3: Example on how to load and display a sprite image |
In this article using Flash Actionscript 3, we will demonstrate a very easy way to load a sprite with a bitmap.
It will show you how you can simply add an image to your flash library, programatically create a sprite, attach the image to that sprite and display it on the screen. This will be done programatically instead of using the timeline.
Once you are able to understand how this is done, you can then take the sprite and manipulate it in your flash application. It is very useful to do things through actionscript vs. the timeline at times because it keeps your project cleaner and easier to manage especially if you have many, many images that you want to manipulate. Several properties of sprites include X and Y coordinates, fading in and out, rotating and resizing. Flash has very intuitive ways of allowing you to do this.
But first, lets start with an example on how to create a sprite:
 |
STEP 1: Import an image to the flash project library.
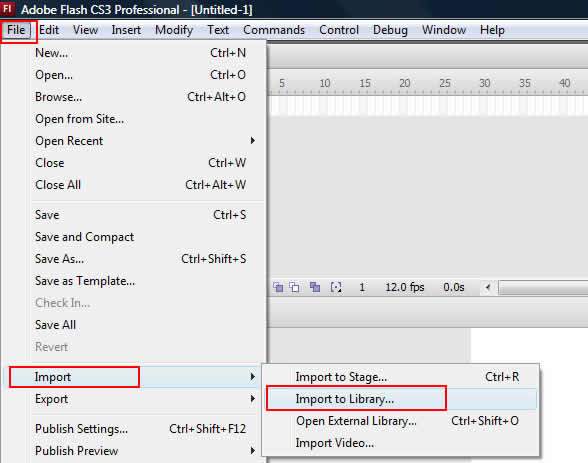
This is easily done by selecting "File" -> "Import" -> "Import to Library"

STEP 2: Once it is imported, you can see the image in your library by selecting "Window" -> "Library" from the main menu.
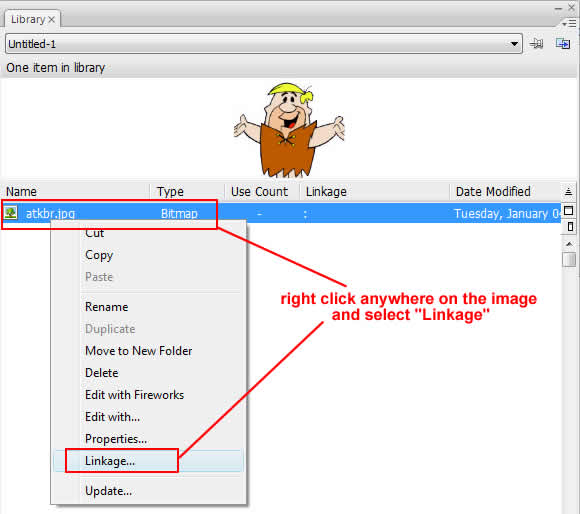
From there, you would want to "Right Click" the image and select "Linkage".

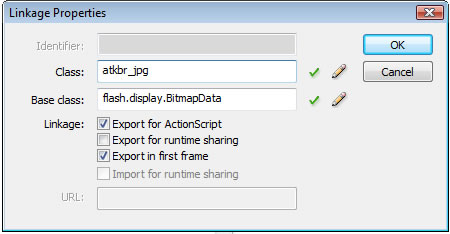
STEP 3: Once the linkage window appears as shown below, you will need to give the image a "Class" name. In this case we named it "atkbr_jpg". Keep in mind that we are not using any spaces and no periods. If we want a placeholder for clarity, we use an underscore (_). We also check the box that says "Export for Action-script" and "Export in First Frame"

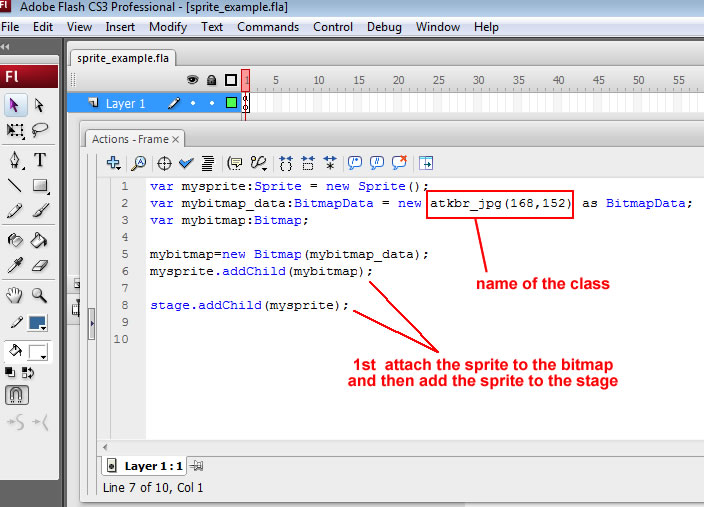
STEP 4: Click the mouse on the first frame in the timeline and press F9. This will bring up the action-script window. Proceed to enter the action-script as shown. In this example we first create an empty sprite. we then create a bitmap_data and assign it the same name as the image class name with dimensions. In this example, the image size is 168 x 152. We create a new bitmap and assign it the bitmap data and then we attach the bitmap to the sprite and the sprite to the stage. Once it is on the stage, it will be visible when you run it.

And there you have it, a simple example on how to create a sprite.
This is easily done by selecting "File" -> "Import" -> "Import to Library"
STEP 2: Once it is imported, you can see the image in your library by selecting "Window" -> "Library" from the main menu.
From there, you would want to "Right Click" the image and select "Linkage".
STEP 3: Once the linkage window appears as shown below, you will need to give the image a "Class" name. In this case we named it "atkbr_jpg". Keep in mind that we are not using any spaces and no periods. If we want a placeholder for clarity, we use an underscore (_). We also check the box that says "Export for Action-script" and "Export in First Frame"
STEP 4: Click the mouse on the first frame in the timeline and press F9. This will bring up the action-script window. Proceed to enter the action-script as shown. In this example we first create an empty sprite. we then create a bitmap_data and assign it the same name as the image class name with dimensions. In this example, the image size is 168 x 152. We create a new bitmap and assign it the bitmap data and then we attach the bitmap to the sprite and the sprite to the stage. Once it is on the stage, it will be visible when you run it.
And there you have it, a simple example on how to create a sprite.